
How Does This 3D Stuff Work, Anyway?
Part 2, The Property Editor
After one has described the geometry of the objects in a scene, using a modeler, one then has to describe the properties, or how the surface of an object looks. Is it shiny? Does it reflect other objects in the scene? What overall color is it? Does it have a texture? Is it bumpy or smooth? Is it transparent, and if so, does it bend the light rays going through it?
All of those questions listed above must be answered by an artist using a 3D system. Luckily, the tools to make these decisions already exist in the more sophisticated sort of 3D graphics programs, in a module that I'll refer to as the Properties Editor. Depending on your software, this may be called a materials editor, rendering library, shader maker, or what-have-you. What all of these modules do is give you some sort of idea what effect the application of colors, textures, lights, and other properties might have on the appearance of your object.
The usual interface to such a program consists of a series of spheres in frames on the screen. Each of these frames may be selected, changes can be made to some sort of controls, and then the spheres are rendered very quickly to give the user an interactive view of how the object might look.
Something like this:
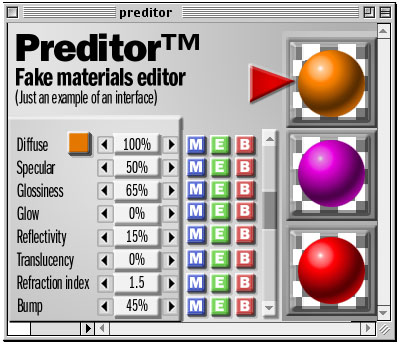
Needless to say, this kind of interaction can only give a user some vague idea how the object will finally look. In real life, even after tweaking the colors and parameters to one's liking, nothing will give you a better look at your final project than an actual test render or two (or dozen). There are some interfaces that are better than others in this regard.
Some of the common parameters you can change (depending on the nature of the material you're working on) are:
Color - The actual color of the object. Usually you end up with three numbers which detirmine the color in RGB, HSL, or some other color model.
Ambience - The color of the shadowed part of the object.
Diffuse - The color of the lighted portion of the object, sort of the overall lit color of the object.
Highlight - The color and brightness of the "hot spot" on an object. This color is usually added to the diffuse to calculate the final color at that location..
Transparency - How visible the object is. A transparent object allows you to see what's behind it.
Shininess - How shiny the object is. Objects can be matte, like cork, or highly polished, like chrome, with all degrees of shininess between.
Reflectivity - How reflective the object is. A reflective object may show the image of other objects in the scene, like a mirror.
Refractivity - How refrative the object is. Refraction simulates the bending of light rays through a transparent material, like glass, or water, causing distortions.
... and others, depending on your software...
Other things that might be handled in a properties editor might include color mapping (taking a picture and wrapping or projecting it on a surface), bump mapping (simulating a complex, often bumpy surface by perturbing the surface normals on an object), and other techniques.
Perturbing the surface normals? Uh, think of that as a technique to make a smooth piece of geometry appear rough and bumpy, often like the skin of an orange.
Each of these properties will contribute to the final color of any given pixel in a scene. Think of the final rendering of the scene as an additive process where the colors of an image are the sum result of adding the color of the object, the color and intensity of the light (influenced by the angle of that light), subtracting any cast shadows or transparency, as well as calculating any of the more obscure properties like reflection and refraction. It's just that easy. It makes me glad that someone out there understands all of the math involved and allows me to just make pretty pictures.
Next time we'll talk about putting those colored, geometrically described objects into a scene, arranging a virtual camera and lights, and then rendering a scene.